
Product label printing is a detailed process that blends design, material selection, and precise manufacturing techniques. Every step—from artwork setup to production and finishing—plays a role in creating labels that are functional, durable, and visually aligned with your brand. Knowing how the label printing process works can help you plan ahead, avoid delays, and choose the right specifications for your product. This breakdown covers each stage of the label manufacturing process so you can approach your next label project with clarity and confidence.
Step 1: Submit Your Label Design Files (aka the Artwork)
 A well-designed label with eye-catching graphics and the right product information is the foundation for an effective label. Sharing the design concept with your product label printing provider before placing an order helps avoid issues during prepress or production.
Label printing companies can provide input on enhancing artwork and label performance, such as recommending font sizing, colors, or special printing techniques such as embossing or foil stamping. They can also recommend the best label size, material, or die based on your product type and application method. Final artwork should always follow the requirements established by the print provider. This includes CMYK color mode, minimum resolution, die lines, bleed/safe zones, and acceptable file format.
File preparation is a key part of the label printing process, ensuring your label performs and prints as expected.
Step 2: Choose Materials, Adhesives, and Finishes (Key to Cost and Performance)
 Product label printing requires a quote based on all specifications, from size, shape, special printing techniques, number of colors, and SKUs to the label material, adhesive, and quantity. Pricing is inextricably tied to the artwork, so these two steps go hand-in-hand in the label printing process.
Every part of the label production process—size, materials, finish, and quantity—affects pricing, production speed, and label performance. A quote will be provided based on the specs submitted and will include an estimated turnaround time once the proof has been approved. Label cost is priced per 1,000, with additional plate and die charges when applicable. Shipping and applicable taxes are additional. A nominal fee for a label prototype can be added to the quote.
If you’re trying to get a sense of cost before you finalize your specs, our instant quote tool lets you plug in size, material, quantity, and finish to get a ballpark in under two minutes — no commitment required. It’s a good way to see how different spec choices affect pricing before you go into the details with our team.
Step 3: Prepress and Proofing

Prepress is a critical stage in the label manufacturing process, where your design is prepared for flawless reproduction. Once the final artwork has been submitted to the printer, the file goes through a preflight process to ensure it is compatible and includes all elements for printing.
Catching any issues during this stage ensures the rest of the product label printing process goes smoothly. A PDF proof will be generated and emailed to the customer for approval. This is an important opportunity to question or double-check anything that looks inaccurate. How the artwork appears on the PDF proof is how the label will be printed.
Once the customer submits digital proof approval and the printer receives it, the order is scheduled. The typical lead time at Columbine Label is three business days from proof approval; however, during busy times, this lead time may be longer.
Note: Changes made after proof approval start the clock over again.
If you’re new to label printing — or have been burned by revision delays before — it’s worth reviewing your files against our art guidelines before you submit. It covers everything from bleed zones to color mode to file format, and catching issues here is a lot easier than catching them at proofing.
Step 4: The Label Printing Process
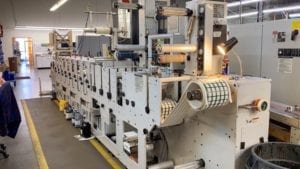
Once your artwork is approved and the order is scheduled, the job moves into production. This is the core of the label printing process, where your design is brought to life on your chosen material.
The type of printing used—digital or flexographic—depends on the label’s specifications. Digital printing is ideal for lower-quantity runs, multiple SKUs, or tight timelines. It offers consistent, high-quality color matching using inks specifically formulated for digital equipment, and doesn’t require printing plates.
Flexographic printing is used for large-volume orders or labels that require two-sided printing. This method utilizes water-based inks and printing plates, making it highly efficient for longer runs within the label production process.
Step 5: Finishing and Die Cutting
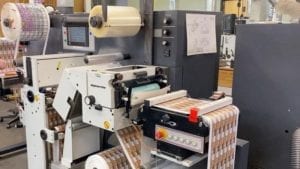
After printing, the labels move into the finishing phase—an important step in the label manufacturing process that adds durability and visual appeal. At this stage, enhancements such as embossing, foil stamping, protective laminates, and UV coatings can be applied to the printed labels.
The die-cutting step occurs alongside finishing. Each label is cut to its specified shape, and the large printed rolls are slit into narrower rolls for easier handling. Proper finishing improves appearance and ensures that your labels hold up during storage, shipping, and final application.
Step 6: Winding
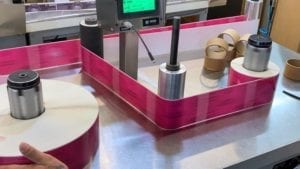 This final step is where it all comes together before applying the label to the product. This is where each large roll of labels is wound to create smaller, more manageable roll sizes for the final application. How the labels will be applied determines how the labels are oriented on the roll, also known as the unwind position. This consideration doesn’t matter as much for labels that will be applied by hand. However, for labels that a machine will apply, the wrong copy position and unwind direction could mean your labels will be applied upside-down and will shut down production. The layout of the label on the roll and how it needs to be applied to the bottle or package is a basic science in the custom labeling world. At this step, the rewind machines re-roll labels as needed with quantities required by the co-packer or manufacturer handling it in-house.
Step 7: Quality Control and Inspection

This critical step in the label manufacturing process helps catch issues early, minimizing the risk of errors or misprints reaching your production line. Defects such as smudging, misalignment, or edge lift are flagged and corrected before packaging begins.
Step 8: Packaging and Shipping

We offer local pickup, regional delivery, and national shipping through trusted carriers. Tracking details are provided for each shipment, and our team remains available for any post-delivery support. Proper packaging ensures that your product labels arrive in excellent condition and ready for use.
Columbine Label: Your Partner in the Label Printing Process
The label printing process involves many moving parts, but with the right partner, it doesn’t have to feel overwhelming. Understanding how labels move from concept to production helps you plan ahead, avoid delays, and get the right result for your product.
At Columbine Label, we guide our customers through each step—from design file setup to final delivery—ensuring quality, performance, and peace of mind at every stage. Contact us today with any questions you have or to receive a quote on your next label printing project.